The Secret Trick to Unclog Stovetop Nozzles and Achieve a Stronger Flame
A gas stovetop is one of the most reliable tools in the kitchen—until the flame starts to weaken. Instead of a crisp, even ring of blue fire, you get a sputtering, uneven flame that struggles to reach the edge of the burner. Food takes longer to cook, the flame may flicker or turn yellow, and the burner may even fail to light properly.
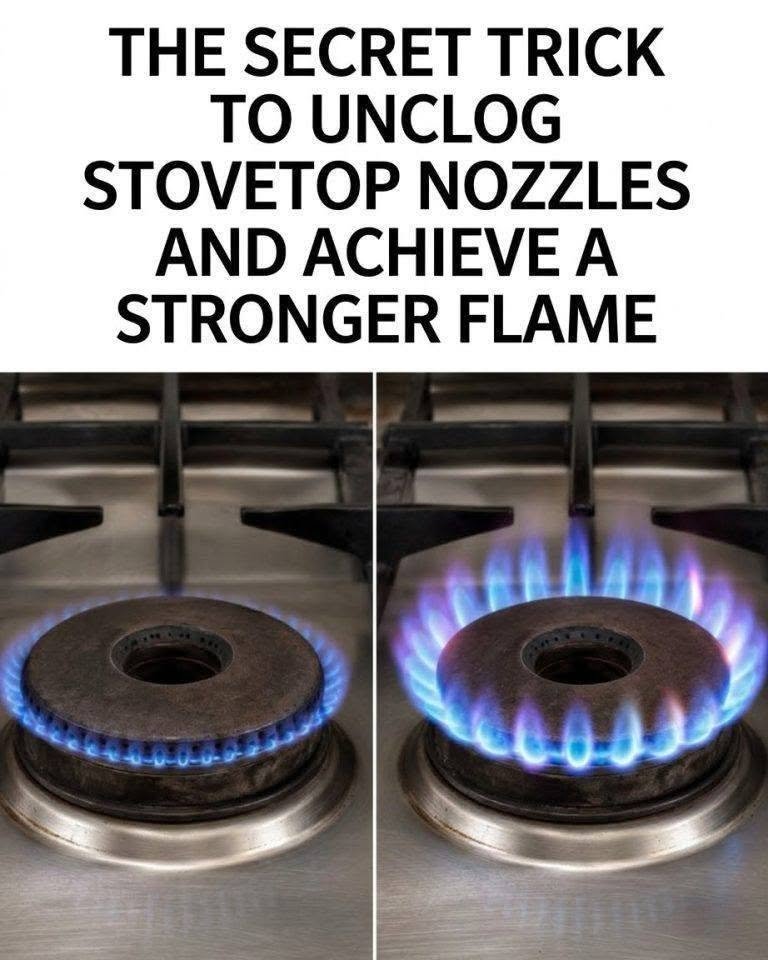
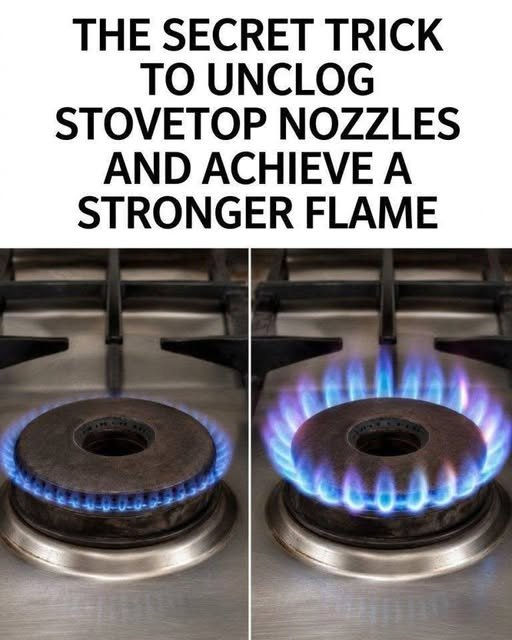
The image of the before-and-after burner tells the story clearly: on the left, a low, uneven flame; on the right, a full, steady ring of blue flame after cleaning. The “secret trick” is not a dangerous hack, a special additive, or a modification to the gas line. It is a thorough, safe cleaning of the burner ports and components—plus correct reassembly.
This guide explains what the visible “nozzles” actually are, why gas burners lose performance, how to clean them safely, and when the problem is bigger than a clogged port. It also covers the difference between a healthy blue flame and a dangerous yellow flame, plus the maintenance habits that keep burners working efficiently.
Understanding the Gas Burner: Ports, Orifices, and Caps
The word “nozzle” is often used loosely, but a gas burner has several distinct parts. Understanding them prevents damage.
The Gas Orifice
The gas orifice is a tiny, precisely sized brass fitting that controls how much gas enters the burner. It is usually located beneath the burner head or cap. This part is calibrated by the manufacturer and should never be poked, drilled, enlarged, or modified. Changing the orifice size can cause incomplete combustion, dangerous carbon monoxide production, or an unsafe flame.
The Burner Head and Ports
The burner head is the removable metal piece with small holes or slots around its edge. These holes are the burner ports. Gas flows out of the ports and mixes with air before burning. When grease, food residue, mineral deposits, or cleaning products clog the ports, the flame becomes weak, uneven, or yellow.
The Burner Cap
The burner cap sits on top of the burner head. It helps distribute gas and protect the ports. If the cap is misaligned, warped, wet, or the wrong size, the flame will not burn correctly.
The Igniter
The igniter is the small ceramic-and-metal component that creates a spark. A dirty or wet igniter may click but fail to light the gas. Cleaning it carefully can restore reliable ignition.
The Air Mixture
Gas burners mix gas with air before combustion. Some burners have an air shutter or adjustment collar. If the mixture is incorrect, the flame may be yellow, lifting, or noisy. Air adjustments should generally be made by a qualified technician.
Why the Flame Becomes Weak or Uneven
A weak flame is usually a symptom, not a random malfunction. Common causes include:
Clogged burner ports from grease, food spills, or boil-overs.
Dirt or residue on the burner cap.
Moisture trapped in the burner after cleaning or a spill.
A misaligned or incorrectly seated burner cap.
A dirty igniter.
Rust or corrosion on the burner head.
Low gas pressure or a problem with the gas supply.
A blocked or faulty regulator.
Incorrect air-to-gas mixture.
A damaged burner component.
The before-and-after image most likely shows a burner that was cleaned and reassembled correctly. The flame improved because gas could flow evenly through the ports again.
Safety First: Rules for Cleaning Gas Burners
Gas appliances require respect. Before cleaning:
Turn off the burner controls. Make sure all knobs are in the off position.
Wait for the stovetop to cool completely. Never clean a hot burner.
Do not disconnect gas lines unless you are qualified. Cleaning removable burner parts does not require touching the gas connection.
Never smell gas and ignore it. If you detect a gas odor, turn off the gas supply if safe, open windows, avoid flames or electrical switches, and call your gas provider or a qualified technician.
Do not use water inside the gas orifice. Keep water away from the gas jet and internal gas passages.
Do not enlarge the ports or orifice. Never use a drill, metal wire, or sharp needle to widen holes. This can create an unsafe flame.
Do not soak sealed components. Only soak parts that are designed to be removable and washable.
Dry everything completely. Moisture is a common cause of poor ignition and sputtering.
The Safe Cleaning Method: Restoring an Even Blue Flame
The “secret trick” is a deep clean using simple household supplies, followed by careful drying and reassembly.
What You Need
Warm water
Mild dish soap
White vinegar
Baking soda
A soft toothbrush or nylon brush
A soft cloth or microfiber towel
A wooden toothpick or soft brush for stubborn ports
Compressed air (optional)
Isopropyl alcohol and a cotton swab for the igniter
Step 1: Remove the Grates, Caps, and Burner Heads
Turn off the stovetop and let it cool. Remove the grates, burner caps, and burner heads if your model allows. Check your manufacturer’s manual for removable parts. Do not force anything.
Step 2: Soak the Removable Parts
Fill a sink or basin with warm water and a few drops of mild dish soap. Add about half a cup of white vinegar. Soak the grates, caps, and burner heads for 15 to 30 minutes. Vinegar helps loosen mineral deposits and grease. For heavy grease, add a tablespoon of baking soda to create a gentle scrubbing paste.
Do not soak the igniter or any electrical component.
Step 3: Scrub the Burner Ports Gently
Use a soft toothbrush to scrub the burner head, especially around the ports. For stubborn clogs, use a wooden toothpick to gently loosen debris. Avoid metal pins, needles, or wire, which can scratch or enlarge the ports. Rinse with clean water.
Step 4: Clean the Igniter
Dip a cotton swab in isopropyl alcohol and gently wipe the igniter. Do not bend or scratch the ceramic. Dry completely.
Step 5: Dry Everything Thoroughly
This is critical. Moisture in the burner ports can cause sputtering, weak ignition, or a yellow flame. Dry all parts with a clean cloth, then let them air-dry completely. If possible, use compressed air to blow out the ports. Do not reassemble while any part is wet.
Step 6: Clean the Stovetop Surface
Wipe the stovetop with a damp cloth and mild cleaner. Remove grease and food residue around the burner base. Keep the area around the igniter clean.
Step 7: Reassemble Correctly
Place the burner head back into its correct position. The burner head must sit flat and fully seated. Align the burner cap correctly—many caps have a small notch, pin, or orientation mark. If the cap is misaligned, the flame will be uneven or yellow. Reinstall the grates.
Step 8: Test the Burner
Turn on one burner and observe the flame. A healthy flame should be blue, steady, and even around the ring. Some orange tips may appear briefly from dust or moisture, but a persistent yellow flame indicates a problem. If the flame is still weak or yellow after cleaning and correct reassembly, stop using the burner and call a technician.
What a Healthy Flame Should Look Like
A properly functioning gas burner produces a blue flame. Blue indicates complete combustion—the gas is burning efficiently with the correct air mixture. The flame should be steady, not lifting off the burner, not roaring loudly, and not producing soot.
A yellow or orange flame often indicates incomplete combustion. This can be caused by clogged ports, a misaligned cap, moisture, incorrect air mixture, or a gas pressure problem. Incomplete combustion can produce carbon monoxide, an odorless and dangerous gas. If the flame remains yellow after cleaning, do not ignore it.
The Difference Between Cleaning and “Adjusting”
Some online tutorials suggest adjusting the air shutter or using a wire to clean the gas orifice. These are not beginner repairs. The gas orifice is precision-sized; altering it can create an unsafe flame. Air shutter adjustments should be made by a qualified technician using proper combustion testing.
The safe, homeowner-friendly “trick” is cleaning the removable burner components and ensuring correct reassembly. If that does not restore a steady blue flame, the issue is likely gas pressure, a faulty regulator, a damaged burner, or a blocked internal passage—problems for a professional.
Preventing Future Clogs
Regular maintenance prevents weak flames and extends the life of the stovetop.
Wipe up spills immediately after the burner cools.
Clean the stovetop weekly with mild soap and water.
Deep-clean burner caps and heads monthly, or more often if you cook with oil frequently.
Never line the burner area with aluminum foil; it can block airflow and ports.
Use pots and pans that sit flat and do not boil over.
Avoid spraying cleaning products directly into the burner ports.
Check that burner caps are seated correctly after every cleaning.
Schedule professional servicing if flames are persistently uneven or yellow.
When to Call a Technician
Call a qualified appliance technician or gas professional if you notice:
A persistent gas smell.
A hissing sound near the gas connection.
A yellow flame that does not improve after cleaning.
Soot deposits on pots or burner caps.
A flame that lifts off the burner or burns erratically.
Weak flame on every burner, which may indicate a gas supply or regulator issue.
A damaged, warped, or rusted burner head.
Repeated ignition failure after cleaning and drying.
Any sign of carbon monoxide exposure, such as headaches, dizziness, nausea, or drowsiness while using the stove.
Conclusion: Clean Ports, Not Modified Parts
The viral before-and-after image makes the result look dramatic: a weak flame transformed into a strong, even ring of blue fire. The real secret is simple and safe. Clogged burner ports, dirty caps, moisture, and misalignment are common causes of poor flame performance. A thorough clean with warm soapy water, vinegar, and a soft brush—followed by complete drying and correct reassembly—can restore efficient combustion.
Do not confuse cleaning with modification. Never enlarge the gas orifice or ports, never use water inside the gas jet, and never ignore a persistent yellow flame. A healthy blue flame is the sign of a clean, correctly assembled, safely operating burner. If cleaning does not fix the problem, professional service is the right next step.
Frequently Asked Questions
What causes a weak flame on a gas stove?
Weak flames are commonly caused by clogged burner ports, grease or food residue, moisture, misaligned burner caps, dirty igniters, low gas pressure, or a faulty regulator.
Can I clean the gas orifice with a needle?
No. The gas orifice is a precision part. Poking it with a needle or wire can enlarge or damage it, causing an unsafe flame. Clean only the removable burner ports with a soft brush or wooden toothpick.
Why is my flame yellow instead of blue?
A yellow flame usually indicates incomplete combustion. It can be caused by clogged ports, a misaligned cap, moisture, incorrect air mixture, or a gas pressure issue. If it persists after cleaning, call a technician.
How often should I clean my gas burner ports?
Clean the stovetop weekly and deep-clean removable burner parts monthly, or more often if you cook with oil frequently or have boil-overs.
Can I use vinegar and baking soda to clean burner parts?
Yes, for removable burner caps and heads. Soak them in warm water with mild dish soap and vinegar, and use baking soda as a gentle scrub for grease. Do not soak igniters or electrical parts.
Should I use compressed air on burner ports?
Yes, after washing and drying, compressed air can help blow out loosened debris from the ports. Keep the can upright and use short bursts.
Why does my burner click but not light?
A dirty or wet igniter, moisture in the burner, a misaligned cap, or a clogged port can prevent ignition. Clean and dry the igniter and burner parts. If the problem continues, call a technician.
Is a stronger flame always better?
No. The goal is a steady, even blue flame, not a larger flame. An excessively large or yellow flame can indicate improper combustion and may be unsafe.
Can I adjust the air shutter myself?
Air shutter adjustments should generally be made by a qualified technician with proper combustion testing. Incorrect adjustment can cause incomplete combustion or carbon monoxide production.
When should I replace a burner head or cap?
Replace damaged, warped, rusted, or cracked burner parts. A cap that no longer sits flat or a burner head with enlarged or damaged ports should be replaced with the correct manufacturer part.