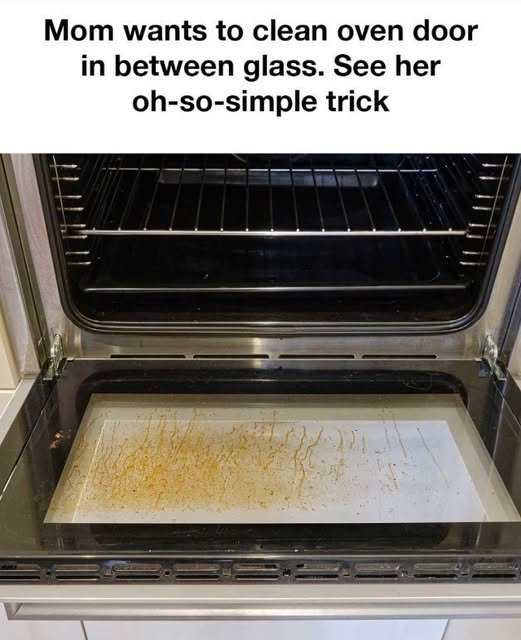
The Oh-So-Simple Trick to Clean the Glass Between Your Oven Door Panels
There is a unique and deeply frustrating kind of annoyance that comes with a dirty oven. You can spend an hour scrubbing the interior racks, spraying down the walls, and wiping away the blackened carbon deposits until the inside of the oven shines like new. But when you step back and look at the appliance, you are met with a smudged, streaky, grease-stained window that obstructs your view of the culinary masterpiece baking inside.
The glass on the outside of the oven door is easy enough to clean. The inside of the door—the side facing the oven cavity—can be scrubbed with a little effort. But the true nightmare of oven maintenance is the grime trapped between the layers of glass. Over time, grease splatters, vapors, and steam find their way into the tiny ventilation holes at the top or bottom of the door. Once there, the grease bakes onto the interior panes of glass, creating a murky, yellowish-brown film that cannot be reached with a standard sponge or cloth.
The image above captures this exact frustration, showing an oven door with heavy, baked-on streaks of grease trapped between the panes. The caption promises: “Mom wants to clean oven door in between glass. See her oh-so-simple trick.”
Fortunately, this is not a problem that requires buying a new oven or paying hundreds of dollars for a professional appliance technician. There are indeed a few highly effective, accessible tricks to clean that trapped glass. Depending on your comfort level with DIY repairs and the design of your specific oven, you can either utilize a clever no-disassembly hack or safely remove the glass panels entirely for a thorough, deep clean.
This comprehensive guide will walk you through the entire process step-by-step. We will explore the anatomy of an oven door, the critical safety precautions you must take, the “hanger trick” for a quick fix, and the definitive disassembly method to restore your oven door to pristine, crystal-clear condition.
Understanding Your Oven Door: Why Grease Gets Trapped
To effectively clean the glass between the panels, it helps to understand how your oven door is constructed. A standard modern oven door is not just a single pane of glass in a metal frame. It is a complex assembly designed to protect you from extreme temperatures and to keep the heat inside the oven.
The Anatomy of an Oven Door
Most oven doors consist of two to four panes of glass. The outermost pane is usually a decorative and structural piece. The innermost pane is a specialized heat-resistant glass that faces the cooking cavity. Sandwiched in between are one or more middle panes, often coated with a reflective material to bounce heat back into the oven, improving energy efficiency.
These panes are separated by a metal frame and spacers. To prevent the buildup of pressure and to allow heat to dissipate evenly, the door features ventilation slots. Unfortunately, these necessary vents are also the entry point for airborne grease, steam, and food particles.
Why Conventional Cleaning Fails
Standard glass cleaners are formulated to remove fingerprints and light smudges. They are completely ineffective against polymerized, baked-on cooking grease. Furthermore, no matter how much you spray the outside or the inside of the glass, the liquid cannot magically penetrate the sealed space between the panes. The grime is trapped, and it requires a specific physical intervention to remove.
Essential Safety Preparations Before You Begin
Before attempting any cleaning method, whether it is the no-disassembly trick or the full removal process, safety must be your top priority. Ovens are heavy appliances that operate on high voltage.
1. Unplug the Oven
This is the most critical step. Even if you are only cleaning the glass and not touching the electrical components, the oven door often houses the control panel wiring for the display, lights, and temperature sensors. Before you do anything, pull the oven away from the wall and unplug it from the electrical outlet. If it is a hardwired unit, turn off the dedicated circuit breaker in your home’s electrical panel.
2. Allow the Oven to Cool Completely
Never attempt to clean an oven door while it is hot. The glass is susceptible to thermal shock, which can cause it to shatter instantly if exposed to cold water or cleaning solutions. Ensure the oven has been off for several hours and is completely cool to the touch.
3. Gather Your Supplies
You will need a specific set of tools and cleaning agents for this job.
A screwdriver: Usually a Phillips head, but sometimes a Torx or flathead, depending on your oven brand (check your manual).
A heavy-duty degreaser: You can use a commercial oven cleaner (paste or spray), or a powerful homemade mixture.
Microfiber cloths: Several of them. These are excellent for trapping grease and leaving a streak-free finish.
A bucket of hot water.
Dish soap: (Dawn is highly recommended for cutting grease).
Baking soda: For creating an abrasive, grease-lifting paste.
White vinegar: For final rinsing and cutting through hard water deposits.
A wire coat hanger or a long, thin ruler: (For the no-disassembly trick).
Rubber gloves: To protect your hands from harsh chemicals and hot water.
The “Oh-So-Simple” No-Disassembly Trick
If you are not comfortable taking your oven door apart, or if your oven has a complex door design that makes disassembly difficult, the “hanger trick” is the most popular and accessible method. This is likely the “oh-so-simple trick” referenced in the viral image. It allows you to clean between the glass by sliding a cleaning tool through the ventilation holes.
Step 1: Prepare the Cleaning Tool
You cannot simply pour cleaning solution into the vents—this will create a massive, messy flood inside the door that is nearly impossible to dry out. You need to deliver the cleaning agent via a tool.
Take a sturdy wire coat hanger and untwist the top. Straighten it out as much as possible.
Take a clean microfiber cloth (or a piece of an old cotton t-shirt) and wrap it tightly around one end of the hanger.
Secure the cloth to the hanger using a rubber band or a piece of strong tape. Ensure the cloth is securely fastened so it does not slip off inside the door, which would be a disaster.
Alternatively, if the vent holes are large enough, you can use a long, thin ruler wrapped in a microfiber cloth.
Step 2: Apply the Cleaning Solution to the Cloth
Do not spray the solution directly into the oven door. Instead, heavily spray the cleaning solution onto the cloth wrapped around the hanger. You want the cloth damp and saturated, but not dripping wet. A mixture of warm water, a few drops of dish soap, and a splash of white vinegar works wonders on grease.
Step 3: Insert and Swipe
Locate the ventilation holes at the top or bottom of the oven door.
Carefully insert the cloth-wrapped end of the hanger into the vent hole.
Gently maneuver the hanger so the cloth is pressed against the inside of the glass.
Swipe the tool back and forth in a gentle, sweeping motion. You will begin to see the grease and grime transferring onto the cloth.
Pull the tool out, wash the cloth, re-apply the cleaner, and repeat the process.
Step 4: The Rinse Cycle
Once you have successfully removed the grease, you must rinse the glass to prevent streaks. Wrap a clean section of the cloth around the hanger, dampen it with plain water, and repeat the swiping process to remove any soapy residue.
Step 5: Drying to Prevent Streaks
Finally, wrap a dry cloth around the hanger and swipe the glass several times to absorb all moisture. If you leave moisture trapped between the glass, it will evaporate when you next use the oven, leaving behind hard water spots and streaks.
Note: While effective for light to moderate grime, the hanger trick can be time-consuming and might not completely remove heavily baked-on carbon deposits.
The Definitive Method: Removing the Oven Door and Glass Panels
If the grime is severe, or if you want a perfectly pristine result, you must remove the oven door and disassemble the glass panels. This sounds intimidating, but for most standard ovens, it is a straightforward process. Warning: Oven doors are heavy. If you feel unsure, ask for a second pair of hands.
Step 1: Open the Door and Locate the Hinges
Open the oven door completely. Look at the hinges on either side of the door where it connects to the main body of the oven. You will typically see a small metal locking mechanism (a flip-latch or a small clip).
Step 2: Lock the Hinges
Flip the locking latches down (towards the door) on both hinges. This locks the hinge arms in the open position, preventing them from snapping shut while you handle the door.
Step 3: Lift the Door Off
With the door open at a 45-degree angle (halfway open), grip the sides of the door firmly. Lift straight up and away from the oven. The hinge arms should slide out of the slots in the oven frame. Place the door on a soft, flat surface, like a towel-covered table, to prevent scratching.
Step 4: Remove the Top Frame Screws
Look at the top edge of the oven door. You will see several screws securing the top metal frame. Use your screwdriver to remove these screws. Keep them in a safe bowl so you don’t lose them.
Step 5: Extract the Glass Panels
Once the top frame is loose, you can carefully lift it off. You will now see the glass panels. Take a photo of how they are arranged before you remove them—this is crucial for reassembly. Carefully lift the inner panes of glass out of the door.
Safety Note: Be incredibly gentle with the glass. If it has a reflective coating, handle it by the edges to avoid damaging the coating.
Step 6: The Deep Clean
Now that you have access to both sides of the glass, you can clean them thoroughly.
For heavy grease: Create a paste of baking soda and water. Apply it to the glass and let it sit for 15 to 30 minutes. This breaks down the grease.
Scrub: Use a non-abrasive sponge to scrub the paste. For stubborn spots, you can use a plastic razor blade or an old credit card to gently scrape without scratching the glass.
Rinse: Wipe away the paste with a damp microfiber cloth.
Final Polish: Spray the glass with a mixture of equal parts white vinegar and water. Buff it dry with a clean, dry microfiber cloth.
Step 7: Reassembly
Carefully place the clean glass panels back into the door frame in the exact order and orientation they were removed.
Reattach the top metal frame and secure it with the screws. Do not overtighten, as this can crack the glass.
To reattach the door to the oven, hold the door by the sides at the 45-degree angle. Align the hinge arms with the slots in the oven frame and slide them in.
Open the door fully and flip the hinge locks back to their original position (up). Gently close the door to test the alignment.
The Best Cleaning Solutions for Baked-On Grease
When dealing with the grime trapped between the glass, you need heavy-duty cleaning power.
Commercial Oven Cleaners
Fume-free, heavy-duty degreasers (like Easy-Off) are incredibly effective. However, they are caustic. You must wear gloves and ensure you rinse the glass thoroughly. Any residue left behind will bake onto the glass the next time you use the oven, creating a new, even more stubborn film.
The DIY Baking Soda and Vinegar Method
This is the safest and most environmentally friendly approach.
Mix a thick paste of baking soda and water.
Apply it to the soiled glass.
Spray the paste with white vinegar. It will fizz and bubble, which helps lift the dirt.
Let it sit for 20 minutes.
Wipe away with a warm, damp cloth.
Polish with a dry microfiber cloth.
The Magic Eraser Technique
A high-quality melamine sponge (like a Magic Eraser) is highly effective for scrubbing streaks off the glass. Caution: Melamine sponges are mildly abrasive. They can dull the finish of some glass over time, so use them gently.
Preventing Future Build-Up
The best way to deal with trapped grease is to stop it from getting in there in the first place.
Wipe up spills immediately. If a pot boils over or a piece of food falls onto the heating element, try to clean it up as soon as the oven is cool.
Avoid spraying water into the vents. When cleaning the inside of the oven, be careful not to spray cleaning solutions or water directly into the ventilation slots at the top or bottom of the door.
Use a splatter guard. When cooking greasy foods (like bacon or roasts), place a splatter guard over the pan to catch the grease before it vaporizes into the oven air.
Regular maintenance. Don’t wait until the glass is opaque with grease. Wipe down the inside of the glass with a damp cloth and mild soap once a week.
When to Call a Professional
While the steps above are safe for most major oven brands (like Samsung, LG, GE, and Whirlpool), there are exceptions. If your oven door has a complex electronic control panel embedded directly in the glass, or if the glass is sealed with a permanent adhesive rather than screws, do not attempt to disassemble it. Consult your oven’s user manual or contact a professional appliance repair service. Furthermore, if the glass is cracked or chipped, do not use it, as the heat of the oven can cause it to shatter completely.
Frequently Asked Questions
Q: Can I pour cleaning solution directly into the vents to clean the glass? No. Never pour liquid into the vents. The door is not designed to drain water. It will pool inside, damage the insulation, and create an impossible mess. You must always apply the cleaner to a cloth and use a tool to reach the glass.
Q: How do I know if my oven glass can be removed? Most standard ovens are designed to be taken apart for cleaning and maintenance. Look for screws at the top of the door frame. If you do not see them, check your user manual. If it says the glass is a sealed unit, do not try to force it apart.
Q: Is it safe to use a razor blade to scrape the glass? A single-edge razor blade held at a 45-degree angle is highly effective for removing burned-on carbon from oven glass. However, you must ensure the glass is wet with a lubricant (like soapy water) to prevent scratching, and you must use a handle to protect your fingers.
Q: Why does my oven glass look cloudy after I clean it? Cloudiness is usually caused by two things: either you left residual cleaning product on the glass, or the glass has been permanently etched by harsh chemicals (like oven cleaner left on for too long). To fix the former, wash the glass thoroughly with plain water and buff with a dry microfiber cloth. If it is etched, the glass may need to be replaced.
Q: How often should I clean between the oven glass? This depends on how often you use your oven and what you cook. If you roast and bake frequently, you may need to clean the inner glass every three to six months. If you use the oven rarely, once a year is sufficient.
Q: What is the best way to dry the glass so it doesn’t have streaks? Microfiber cloths are the secret to streak-free glass. After washing, use a clean, dry microfiber cloth to buff the glass. Do not let it air dry, as water droplets will leave hard water spots.
Conclusion
A dirty, grease-stained oven door is a common household frustration, but it is not a permanent problem. By understanding how your oven is constructed and choosing the method that best fits your comfort level—whether it is the ingenious hanger trick or the definitive glass-removal method—you can restore your oven door to its original, crystal-clear condition.
With the right tools, a little patience, and the powerful cleaning combination of baking soda, vinegar, and dish soap, the grime trapped between the glass doesn’t stand a chance. Remember to always prioritize safety by unplugging the appliance and handling the glass with care. Once the job is done, you can finally enjoy watching your meals bake without the obstruction of a murky, greasy window.