The “Grandpa Trick” to Sharpen Lawn Mower Blades: Separating Viral Hacks from Safe, Effective Maintenance
There is a unique satisfaction in a perfectly manicured lawn. A lush, green, evenly cut lawn is the crowning jewel of home landscaping, a testament to hours of hard work and careful maintenance. However, behind every beautifully striped lawn is a machine that must be in optimal condition. At the heart of that machine is the lawn mower blade.
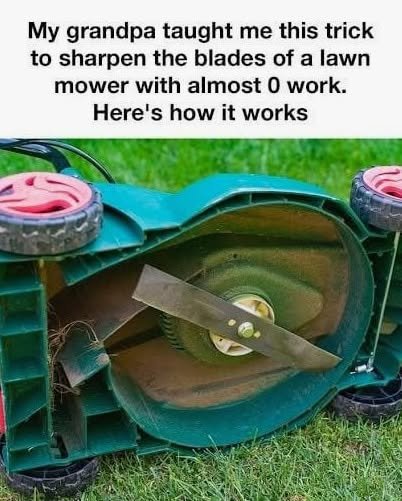
Recently, a viral social media post has captured the attention of homeowners everywhere. It features a photograph of a lawn mower tipped on its side, exposing the central cutting blade, accompanied by a tantalizing claim: “My grandpa taught me this trick to sharpen the blades of a lawn mower with almost 0 work. Here’s how it works.”
For anyone who has ever struggled with dull blades, this post is alluring. The promise of a “zero work” solution to the notoriously tedious chore of lawn mower maintenance is enough to make anyone want to click. But what is this magical trick? Does it actually work, and more importantly, is it safe?
The reality of lawn mower care is a mixture of physics, small engine mechanics, and horticultural science. A dull mower blade doesn’t just make your lawn look bad; it tears and shreds the grass, leaving it vulnerable to disease and drought. While the internet is full of supposed shortcuts—from the dangerous “sand trick” to sharpening blades while they are still attached—the truth is that proper maintenance requires a bit of elbow grease and a strict adherence to safety protocols.
This comprehensive guide will debunk the viral myths, explain the real mechanics of a lawn mower blade, provide a step-by-step professional method for sharpening your blade safely, and offer a routine that will keep your mower running smoothly and your grass looking pristine for years to come.
Decoding the “Almost 0 Work” Viral Trick
When someone claims they can sharpen a lawn mower blade with “almost 0 work,” they are typically referring to one of two highly questionable methods that circulate online. We must address these immediately to prevent serious injury.
The “Sand Trick” Myth
The most infamous “zero work” hack involves pouring a cup of sand, gravel, or a mixture of sand and water into the mower deck while the engine is running. The theory is that the spinning blade will strike the abrasive sand, sharpening itself in the process.
Why it is a terrible idea:
Engine Destruction: The sand does not just hit the blade; it circulates through the entire mower deck. It gets sucked into the air filter, into the carburetor, and into the engine itself. Fine silica sand acts like a grinding paste, instantly destroying the piston rings and cylinder walls. Your mower will likely smoke and die shortly after.
Dangerous Shrapnel: High-speed centrifugal force will eventually turn that sand into a cloud of high-velocity projectiles. It can shoot out of the discharge chute with enough force to injure bystanders, shatter windows, or severely damage property.
Ineffective: Even if the mower survives, the sand does not create a clean, sharp bevel; it just randomly chips and dulls the metal further.
The “Sharpening While Attached” Trick
The image provided shows the blade attached to the mower. Some viral videos suggest simply raising the mower, securing the blade with a block of wood, and using a file or angle grinder without removing the blade.
Why it is incredibly dangerous: While removing the blade is the best practice, if you must sharpen it in place, you are working in an incredibly tight, awkward space. If the block of wood slips, the blade can spin, easily causing severe lacerations. Furthermore, it is almost impossible to properly balance the blade while it is attached. An unbalanced blade will cause severe vibrations that can destroy the mower’s crankshaft, leading to hundreds of dollars in repairs.
The Science of the Cut: Why Blade Sharpness Matters
To understand why sharpening is so important, we must look at what a dull blade actually does to a lawn. It is not just a matter of aesthetics; it is a matter of plant health.
The “Torn” vs. “Cut” Grass Comparison
A sharp blade cuts a grass blade cleanly, like a pair of scissors. The cut edge is smooth and heals quickly. A dull blade, however, acts like a blunt club. It hacks, tears, and shreds the top of the grass plant.
The Consequences of Torn Grass:
Increased Water Loss: The jagged, torn edges of the grass plant create a massive surface area for water to evaporate. Your lawn will require more watering to survive.
Susceptibility to Disease: The ragged wounds are an open door for fungal infections and bacteria. A lawn cut with dull blades is far more susceptible to diseases like brown patch or dollar spot.
Brown Tips: If you look at your lawn a day or two after mowing, and it looks yellowish or brown, you likely have a dull blade. The tips of the grass have died from the trauma of being shredded.
Stunted Growth: The plant has to expend immense energy repairing the shredded tissue instead of growing deep roots and healthy new leaves.
Engine Strain: A dull blade creates more drag and resistance as it hits the grass. This forces the mower’s engine to work harder, burning more fuel and increasing wear and tear on the motor.
The Real “Grandpa” Method: Safety First
If the “zero work” tricks are dangerous myths, what is the actual, safe, and relatively easy way to sharpen a blade? The real trick that experienced landscapers and handy grandfathers know is this: Using the correct tool (an angle grinder) makes the job fast, and removing the blade makes it safe.
Before we begin the step-by-step process, we must address the non-negotiable safety rules.
Essential Safety Precautions
Disconnect the Spark Plug: This is the single most important step. A lawn mower engine can start with just a quarter turn of the blade from compression. If you are working on the blade and the engine fires, you will lose a hand. Always pull the wire boot off the spark plug and tuck it away from the metal to prevent any accidental ignition.
Wear Protective Gear: Safety glasses are mandatory. Metal filings and rust will fly when you sharpen. Heavy-duty leather work gloves will protect your hands from the sharp blade.
Empty the Gas Tank: If you tip the mower on its side to access the blade, you risk spilling gasoline. Not only is this a fire hazard, but if gas flows into the air filter or carburetor, it can flood the engine and cause starting problems. If you cannot empty the tank, run the mower until it runs out of gas before beginning.
Tip the Mower Correctly: Always tip the mower on its side with the air filter and carburetor facing up. If you tip it the other way, oil can leak into the cylinder and air filter, causing a hydraulic lock that can damage the engine upon startup.
Step-by-Step Guide to Sharpening Your Mower Blade
Here is the comprehensive, safe method to achieve a perfectly sharp, balanced blade.
Step 1: Access the Blade
Disconnect the spark plug wire.
Tip the mower onto its side, ensuring the air filter is pointing up.
Take note of the orientation of the blade. It is crucial to reinstall it in the exact same orientation to ensure the cutting edge faces the correct direction. You can take a photo with your phone before removing it.
Step 2: Remove the Blade
The blade is secured by a large central bolt.
To prevent the blade from spinning while you loosen the bolt, wedge a piece of scrap wood (like a 2×4) between the blade and the inner wall of the mower deck.
Using a socket wrench or a box-end wrench, apply pressure to the bolt. Remember: The bolt is usually reverse-threaded. Turn it clockwise to loosen it, and counter-clockwise to tighten it.
Remove the bolt, the blade, and any washers. Keep them safe.
Step 3: Clean and Inspect the Blade
Use a wire brush to scrape off caked-on grass, dirt, and rust.
Inspect for damage: Look closely at the blade. If it is deeply bent, cracked, or has large chunks missing, do not sharpen it. Replace it. A damaged blade can break apart at high speeds and fly through the side of the mower, causing severe injury. Also, check the center hole; if it is out of round (oval instead of circular), it must be replaced.
Step 4: Understand the Bevel
A lawn mower blade is not a piece of paper; it requires a specific angle to cut effectively without instantly becoming dull. Look at the edge of the blade. You will see a distinct angled cut called a bevel.
You should only sharpen the top surface of the bevel.
Never grind on the flat, bottom surface of the blade, as this will ruin the air-lift characteristics of the blade (the curved wing on the back that helps stand the grass up).
The standard angle for a mower blade is usually between 30 and 40 degrees.
Step 5: Sharpen the Blade
There are two effective ways to do this.
Method A: The Metal File (The traditional, low-cost way)
Secure the blade in a bench vise.
Use a high-quality mill file.
Push the file away from you along the angle of the bevel. Only push on the forward stroke; lift the file on the return stroke.
Continue until the edge is sharp and shiny. This takes longer, but is almost impossible to over-heat the blade.
Method B: The Angle Grinder (The fast, professional way)
Clamp the blade in a heavy-duty vise.
Attach a 60-grit or 80-grit flap disc or grinding wheel to your angle grinder.
Wear your safety glasses and gloves.
Turn on the grinder and hold it at the same angle as the existing bevel.
Make smooth, sweeping passes from the base of the bevel towards the cutting edge.
Crucial Warning: Do not hold the grinder in one spot. If you grind for too long in one area, you will heat the metal until it turns blue. This removes the “temper” from the steel, meaning the edge will instantly dull the moment it hits the grass. Keep the grinder moving and dunk the blade in water if it gets too hot to touch.
Step 6: Balance the Blade
This step is often skipped, but it is critical. If you remove more metal from one side of the blade than the other, it becomes unbalanced.
Hang the blade on a nail driven into a wall through the center hole.
If the blade tips to one side, the heavier side is too heavy. You need to grind a little more metal off the heavy side.
Alternatively, use a specialized lawn mower blade balancer (a cone-shaped tool you place on the blade’s center hole).
A balanced blade will hang perfectly horizontal. An unbalanced blade will cause the mower to vibrate violently, which can destroy the bearings in the engine or snap the crankshaft.
Step 7: Reinstall the Blade
Place the blade back onto the mower in the exact orientation you noted before (usually with the sharp edge facing the deck, and the angled wing facing up towards the engine).
Replace the washer and bolt.
Use the wood block method to secure the blade, and tighten the bolt firmly. Refer to your mower’s manual for the exact torque specification (usually between 35 and 50 foot-pounds).
How Often Should You Sharpen Your Mower Blade?
A common question is how frequently this maintenance should be performed.
The General Rule: Sharpen your blade after every 20 to 25 hours of mowing. For the average homeowner mowing a quarter-acre lawn once a week during the spring and summer, this equates to about once or twice a season.
Check for Dullness: If you hit a rock, a tree stump, or run over a heavy branch, stop the mower immediately and check the blade. Impact damage requires immediate sharpening or replacement.
Signs of a Dull Blade: If the tips of your grass are frayed, brown, and shredded, it is time to sharpen. If the mower struggles to cut tall grass and seems to push it over rather than slicing it, it is time to sharpen.
The Debunked “Sand Trick” and the Myth of Zero Effort
To return to the viral post: there is no magic, zero-effort trick to sharpen a mower blade. The concept of “0 work” is a marketing myth designed to generate clicks on social media. The reality is that sharpening a lawn mower blade requires physical exertion, the use of dangerous power tools or files, and a solid understanding of mechanical balance.
If you attempt the “sand trick” (putting sand in the deck and running the engine), you will destroy your mower. The silica will destroy the engine, and the flying debris is a massive safety hazard. If you attempt to sharpen the blade with a file while it is attached to the deck (as the image might suggest), you risk severe lacerations and an unbalanced blade.
The true “trick” to sharpening a lawn mower blade with minimal fuss is having the right tools. A bench vise and an angle grinder turn a tedious chore into a 10-minute job.
Frequently Asked Questions
Q: Can I use a Dremel tool to sharpen my lawn mower blade? A Dremel tool lacks the power and the right type of abrasive wheel to sharpen a thick steel mower blade effectively. It will take an excessive amount of time and will likely overheat the metal, ruining the blade’s temper.
Q: What is the “temper” of a blade, and why does overheating ruin it? Tempering is a heat treatment process that makes steel tough and durable. When you grind steel, the friction creates immense heat. If the metal turns blue, brown, or purple, it has lost its temper and become soft. A soft blade will dull almost immediately upon hitting the grass. This is why you must never over-grind a single spot on the blade.
Q: How do I know if my blade needs to be replaced instead of sharpened? Replace the blade if it is bent, cracked, has deep gouges or missing chunks, or if the center hole is deformed. Additionally, if the blade has been sharpened so many times that the air-lift wing (the curved back edge) has been ground away, it is time for a new blade. The air-lift is essential for a clean cut.
Q: Is it safe to use a bench grinder instead of an angle grinder? A bench grinder can be used, but it is generally harder to use on a long mower blade because the grinding wheel is fixed. An angle grinder with a flap disc provides much better control and is the preferred tool for most professionals.
Q: Do I need to disinfect my mower blade? While not strictly necessary, cleaning off the grass and sap with a wire brush can prevent the spread of fungal diseases from one part of your lawn to another. Some lawn care experts recommend wiping the blade down with a mild bleach solution if you are mowing a lawn that has known disease issues.
Q: Why is the bolt on my mower blade so hard to remove? Lawn mower blade bolts are subjected to extreme vibration and are exposed to the elements, causing them to rust and seize over time. They are also usually tightened to a high torque specification at the factory. Using a penetrating oil (like WD-40) and a breaker bar will help. Remember that the bolt is usually reverse-threaded (turn right to loosen).
Q: Can I sharpen a mulching blade differently? Mulching blades have a more complex, curved cutting edge. They require the same sharpening angle as standard blades, but you must follow the specific curve of the cutting edge. It takes a bit more skill to maintain the bevel on a mulching blade.
Q: Is it better to sharpen the blade before or after winter storage? It is best to sharpen the blade at the end of the season before storing the mower. This ensures that your mower is ready to go the moment spring arrives, and it protects the blade from rusting while sitting idle.
Q: Can I use cooking oil to lubricate the blade after sharpening? Do not use cooking oil, as it can become sticky and attract dirt. A light coat of motor oil or WD-40 on the blade after sharpening will help prevent rust during storage.
Q: My mower deck has a lot of dried grass. Is that a problem? Yes. A clogged deck restricts airflow, which is essential for standing the grass up for a clean cut. It also traps moisture, which leads to rust. Scrape the underside of the deck clean with a putty knife every time you sharpen the blade.
Conclusion
The viral image of the “grandpa trick” to sharpen a lawn mower blade with zero effort is a tempting illusion. It promises a shortcut to a perfect lawn, but it masks the reality of small engine maintenance. There is no magical sand trick that will replace a good sharpening; attempting such methods will only lead to a destroyed engine, a ruined lawn, and a dangerous environment.
The true path to a beautiful, healthy lawn is a combination of consistent mowing habits, proper engine care, and a willingness to get your hands a little dirty. By removing the blade, inspecting it for damage, using an angle grinder or file to maintain the proper bevel, and meticulously balancing it before reinstallation, you are doing the job right.
It is not “zero work,” but it is deeply satisfying. The 15 minutes you spend safely sharpening your mower blade will pay you back tenfold with a lush, green, disease-resistant lawn, a mower that starts easily and runs smoothly, and the quiet pride of knowing that you have mastered a fundamental skill of home ownership.