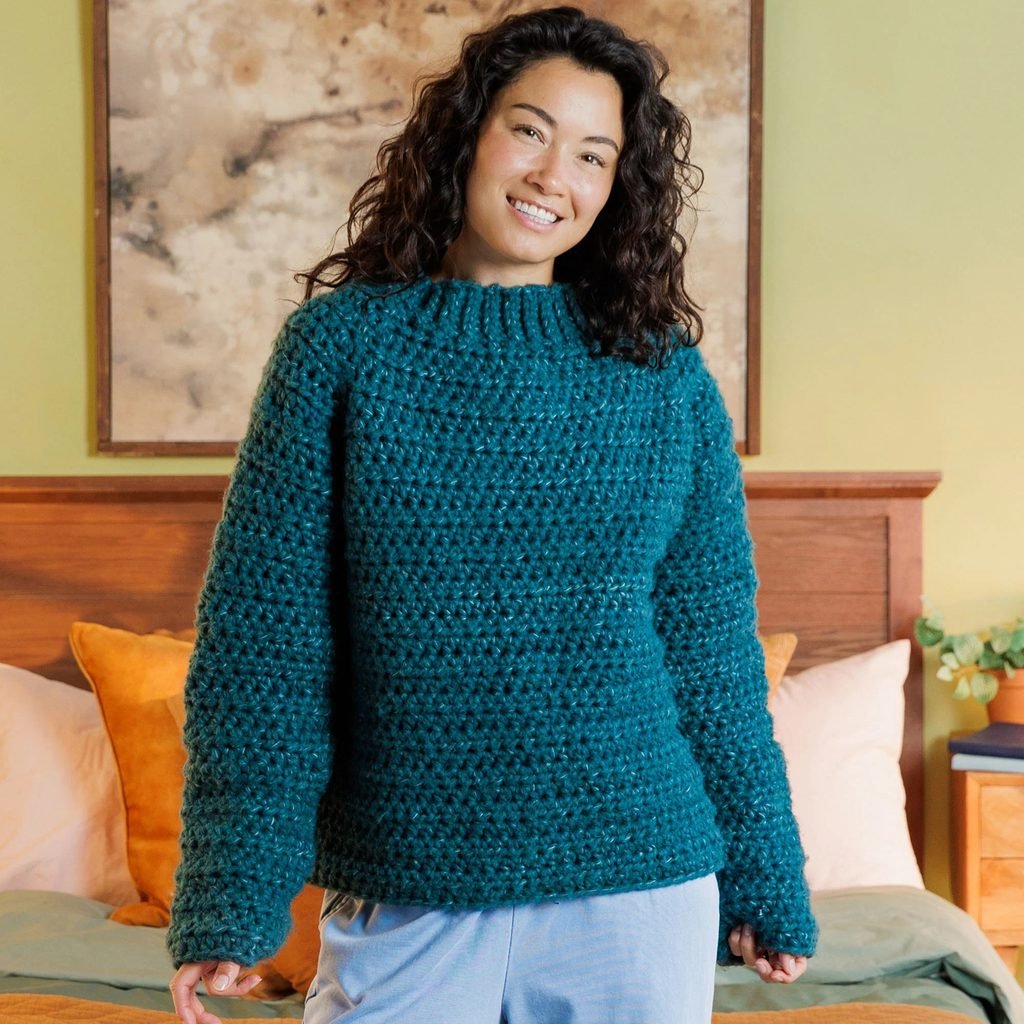
There’s nothing quite like the feeling of wrapping yourself in a handmade sweater—and that’s exactly what this Wrapped in a Hug Crochet Pullover delivers. With its plush texture, cozy silhouette, and effortless top-down construction, this pullover lives up to its name. It’s like a warm embrace you can wear all season long.
Rated Skill Level: Easy, this pattern is perfect for crocheters who want to make their first garment or for experienced makers looking for a relaxing, rewarding project. The chunky yarn and simple half double crochet stitches work up quickly, while the clever raglan shaping gives the sweater a polished, professional finish.
Whether you choose the rich, solid Deep Teal version or the soft, variegated Greenery version, this pullover is destined to become your go-to cozy layer.
Pattern Overview
Skill Level: Easy
Construction: Top-down, worked in joined rounds with turns
Yarn Weight: Super Bulky (Category 6)
Hook Size: U.S. N/15 (10 mm)
Gauge: 7 hdc and 5 rows = 4″ [10 cm]
Materials You Will Need
Version 1 (Solid Color – Pictured in Deep Teal)
Yarn: Bernat® Super Fluffee™ (9.8 oz/280 g; 178 yds/163 m)
Color: Deep Teal (38017)
Yardage: Approx. 668.5 – 1032.5 yards depending on size
Version 2 (Variegated – Pictured in Greenery)
Yarn: Bernat® Super Fluffee Varg™ (6.3 oz/180 g; 122 yds/111 m)
Color: Greenery (52002)
Yardage: Approx. 668.5 – 1032.5 yards depending on size
Tools
Size U.S. N/15 (10 mm) crochet hook (or size needed to obtain gauge). I recommend Susan Bates® Silvalume®.
Susan Bates® stitch markers (essential for this pattern!)
Susan Bates® yarn needle
Sizing & Fit
This pattern includes a wide range of sizes from XS/S to 4/5XL. The pullover is designed with positive ease, meaning the finished chest measurement is larger than your actual chest measurement for a relaxed, hug-like fit.
Size
To Fit Chest
Finished Chest
XS/S
28-34″ [71-86.5 cm]
42″ [101.5 cm]
M
36-38″ [91.5-96.5 cm]
44½” [113 cm]
L
40-42″ [101.5-106.5 cm]
49″ [124.5 cm]
XL
44-46″ [112-117 cm]
52½” [133.5 cm]
2/3XL
48-54″ [122-137 cm]
59½” [151 cm]
4/5XL
56-62″ [142-157.5 cm]
61½” [156 cm]
Abbreviations (US Terms)
Approx = Approximately
Beg = Beginning
Ch = Chain(s)
Cont = Continue
Hdc = Half double crochet
Hdc2tog = Half double crochet 2 stitches together (decrease)
Pat = Pattern
PM = Place marker
RS = Right Side
WS = Wrong Side
Sl st = Slip stitch
Sp = Space
Yoh = Yarn over hook
Special Notes Before You Begin
Construction: The pullover is worked from the top down in rounds. The neckband is made first, then the yoke, and finally the body and sleeves.
Turning: You will join at the end of every round with a slip stitch, then turn your work. This creates a reversible fabric with a unique, plush texture.
Markers: Move the beginning of round marker and raglan line markers up as you go. This is crucial for keeping track of your increases!
Color Coding: The instructions are written for size XS/S. If changes are necessary for larger sizes, the instructions will be written XS/S (M- L- XL- 2/3XL- 4/5XL). Numbers for each size are shown in the same color throughout the pattern. When only one number is given in black, it applies to all sizes.
The Pattern Instructions
1. The Neckband
Start by creating the ribbed neckband.
Ch 7.
Row 1: 1 sl st in 2nd ch from hook. 1 sl st in each ch to end of chain. Turn. (6 sts)
Row 2: Ch 1. Working in back loops only, 1 sl st in each st to end of row. Turn.
Repeat last row until neckband measures 22 (23- 25- 27- 27- 27)” [56 (58.5- 63.5- 68.5- 68.5- 68.5) cm] when slightly stretched.
Do not fasten off. Join last row and 1st row together with 1 row of sl st to form ring.
2. The Yoke (Raglan Increases)
Now we build the shoulders and chest.
Rnd 1 (RS): Ch 1. Work 44 (48- 56- 56- 56- 56) hdc evenly around neckband. Join. Turn.
Rnd 2 (WS): Ch 1. 2 hdc in same sp as sl st. PM on first st for beg of rnd and back left raglan line.
1 hdc in each of next 15 (17- 21- 21- 21) hdc. 2 hdc in next hdc. PM on last st just made for back right raglan line. 1 hdc in each of next 5 hdc.
2 hdc in next hdc. PM on first st for front right raglan line.
Rep from * to * once more, placing last marker for front left raglan line. Join. Turn.
Note: Move beg of rnd and raglan line markers up as you go.
Rnd 3 (RS): Ch 1. 1 hdc in same sp as sl st. Move marker to st just made.
2 hdc in next hdc. 1 hdc in each of next 3 hdc. 2 hdc next hdc. 1 hdc in next (marked) hdc. 2 hdc next hdc. 1 hdc in each of next 15 (17- 21- 21- 21- 21) hdc. 2 hdc next hdc.
1 hdc in next (marked) hdc.
Rep from * to * once. Join. Turn.
(56 (60- 68- 68- 68- 68) hdc)
Rnd 4: Ch 1. 1 hdc in same sp as sl st. Move marker to st just made.
2 hdc in next hdc. 1 hdc in each hdc to 1 st before next marked hdc. 2 hdc in next hdc.
1 hdc in marked hdc.
Rep from * twice more, then rep from * to * once. Join. Turn.
(64 (68- 76- 76- 76- 76) hdc)
Repeat last rnd 6 (6- 6- 7- 9- 10) times more.
(112 (116- 124- 132- 148- 156) hdc)
Work 0 (0- 0- 1- 1- 0) rnd even, ending on a WS rnd.
Sizes M, L and XL only: Next rnd: (RS). Ch 1. 1 hdc in same sp as sl st. Move marker to st just made. 2 hdc in next hdc. 1 hdc in each hdc to 1 st before next marked hdc. 2 hdc in next hdc. 1 hdc in marked hdc. 1 hdc in each hdc to next marked hdc. 1 hdc in marked hdc. Rep from * to * once. Join. Turn. (120- 128- 136) hdc.
Sizes L and XL only: Rep last rnd once more. (132- 140) hdc.
All sizes:Next rnd: Ch 1. 1 hdc in same sp as sl st. 1 hdc in each st around. Join. Turn.
Repeat last rnd, moving markers, until work from pick up rnd at Neckband measures 8½ (9½- 9½- 11- 11- 11)” [21.5 (24- 24- 28- 28- 28) cm], ending on a WS rnd.
3. Divide for Sleeves and Body
This is where the pullover starts to take shape!
Rnd 1 (RS): Ch 1. 1 hdc in same sp as sl st.
Skip next 21 (23- 25- 27- 27- 29) hdc (Sleeve).
Ch 2 (2- 2- 3- 5- 5) for armhole.
1 hdc in each of next 35 (37- 41- 43- 47- 49) hdc.
Skip next 21 (23- 25- 27- 27- 29) hdc (Sleeve).
Ch 2 (2- 2- 3- 5- 5) for armhole.
1 hdc in each of last 34 (36- 40- 42- 46- 48) hdc. Join.
You now have 74 (78- 86- 92- 104- 108) sts (hdc and ch) for Body. Fasten off.
4. The Body
With WS facing, join yarn with sl st in 2nd (2nd- 2nd- 2nd- 3rd- 3rd) ch of ch- 2 (2- 2- 3- 5- 5) of either armhole.
Next rnd: Ch 1. 1 hdc in same sp as sl st. 1 hdc each of next 0 (0- 0- 1- 2- 2) ch. 1 hdc in each hdc to next ch- sp. 1 hdc in each of next 2 (2- 2- 3- 5- 5) ch. 1 hdc in each hdc to next ch- sp. 1 hdc in each of rem 1 (1- 1- 1- 2- 2) ch. Join. Turn.
Next rnd: Ch 1. 1 hdc in same sp as sl st. 1 hdc in each hdc around. Join. Turn.
Repeat last rnd until Body measures 13″ [33 cm], ending on a RS rnd. Fasten off.
5. The Sleeves
1st rnd (WS): Join yarn with sl st in 2nd (2nd- 2nd- 2nd- 3rd- 3rd) ch of ch- 2 (2- 2- 3- 5- 5) of armhole. Ch 1. 1 hdc in same sp as sl st. 1 hdc each of next 0 (0- 0- 1- 2- 2) ch. 1 hdc in each of next 21 (23- 25- 27- 27- 29) sts. 1 hdc in each of rem 1 (1- 1- 1- 2- 2) ch. Join. Turn. (23 (25- 27- 30- 32- 34) hdc)
2nd rnd: Ch 1. 1 hdc in same sp as sl st. 1 hdc in each hdc around. Join. Turn.
Repeat 2nd rnd 4 (4- 4- 4- 0- 0) times more.
Shape sleeve:
1st rnd: Ch 1. 1 hdc in same sp as sl st. Hdc2tog. 1 hdc in each st to last 3 hdc. Hdc2tog. 1 hdc in last st. Join. Turn. (21 (23- 25- 28- 30- 32) hdc)
2nd rnd: Ch 1. 1 hdc in same sp as sl st. 1 hdc in each st around. Join. Turn.
Next rnd: Ch 1. 1 hdc in same sp as sl st. 1 hdc in each st around. Join. Turn.
Rep last rnd until Sleeve from pick up rnd measures approx 18 (18- 18- 18- 17- 16)” [45.5 (45.5- 45.5- 45.5- 43- 40.5) cm], ending on a RS rnd. Fasten off.
Repeat for the second sleeve.
Finishing Touches
Weave in all your loose ends using your yarn needle. Because this pullover is worked in the round with turns, you might notice a slight texture difference on the “wrong side,” but the stitch pattern is designed to look beautiful on both sides!
Tips for Success
Check Your Gauge: This is a chunky pullover. If your gauge is off, your sweater will be too big or too small. Make a swatch first!
Marker Management: Don’t skip the markers. They are your best friend in the yoke section.
Try It On: Because it’s top-down, you can try the pullover on as you go to ensure the yoke fits your shoulders perfectly before separating the sleeves.
Yarn Substitutions: If you can’t find Bernat® Super Fluffee™, look for any super bulky (Category 6) yarn that meets the gauge. Just be sure to check your yardage!