How to Clean Black Mold From a Refrigerator Gasket in Minutes
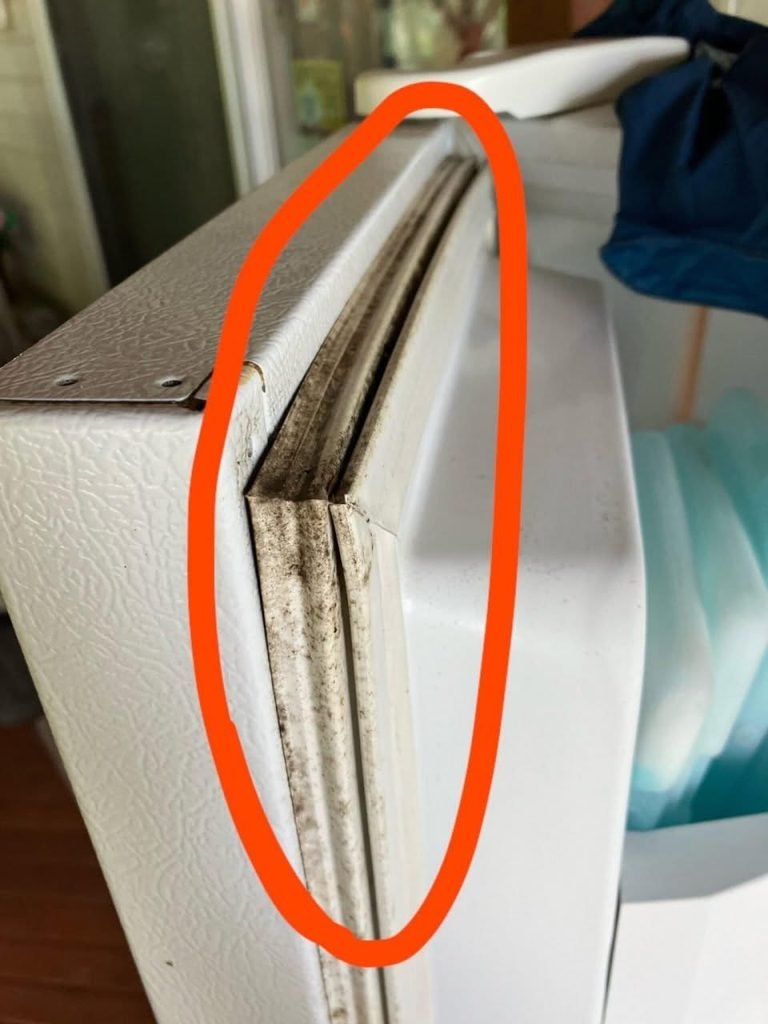
Opening your refrigerator and seeing black mold growing along the door gasket is an unpleasant and unsettling sight. The image in your post shows exactly that—a thick line of dark, speckled grime embedded in the folds of the rubber seal. This is a common problem in many homes, especially in humid climates or if the refrigerator door does not seal properly. The good news is that you do not need to replace the gasket or call a professional. With a few simple household items, you can clean it in minutes and restore it to a like-new condition.
Why Mold Grows on the Gasket
The refrigerator gasket is the rubber seal that runs around the edge of the door. Its job is to keep cold air in and warm air out. Because it is constantly exposed to moisture, food spills, and crumbs, it is the perfect environment for mold and mildew to grow. The folds and crevices of the gasket trap organic matter, and the cool, dark environment allows mold spores to thrive. If left untreated, the mold can spread, cause unpleasant odors, and even affect the air quality in your kitchen.
What You Will Need
To clean the mold from your refrigerator gasket, you will need a few basic supplies:
White vinegar
Baking soda
A small bowl
A soft-bristled toothbrush or a detail brush
A microfiber cloth or paper towels
Rubber gloves
A spray bottle (optional)
Step-by-Step Cleaning Process
Step 1: Prepare Your Cleaning Solution In a small bowl, mix equal parts white vinegar and water. Vinegar is a natural disinfectant and mold killer. It is also gentle on rubber, so it will not damage the gasket. If the mold is particularly stubborn, you can add a tablespoon of baking soda to create a paste. The baking soda provides a gentle abrasive that helps lift the mold from the rubber.
Step 2: Protect Yourself Put on your rubber gloves. Mold can be irritating to the skin and respiratory system, so it is important to take precautions. If you are sensitive to smells, you may also want to open a window or turn on a fan for ventilation.
Step 3: Apply the Solution Dip your toothbrush or detail brush into the vinegar solution or baking soda paste. Gently scrub the moldy areas of the gasket, working the brush into the folds and crevices. Be thorough but gentle. You do not want to tear or damage the rubber. The toothbrush is perfect for getting into the tight spaces where mold likes to hide.
Step 4: Wipe Clean Once you have scrubbed the mold away, use a damp microfiber cloth or paper towel to wipe the gasket clean. Make sure to remove all traces of the vinegar solution and the loosened mold. You may need to rinse the cloth several times.
Step 5: Dry Thoroughly After cleaning, dry the gasket completely with a clean, dry cloth. Moisture is the enemy, so leaving the gasket wet can encourage mold to return. Leave the refrigerator door open for a few minutes to allow the gasket to air dry completely.
Preventing Mold From Coming Back
Once your gasket is clean, there are a few things you can do to prevent mold from returning. Wipe down the gasket with a damp cloth once a week to remove any food particles or moisture. Check the seal regularly to make sure it is tight. If the gasket is loose or damaged, it may need to be replaced. You can also place a small container of baking soda or activated charcoal inside the refrigerator to absorb odors and excess moisture.
When to Replace the Gasket
If the mold has penetrated deep into the rubber and cannot be removed with cleaning, or if the gasket is cracked, torn, or no longer sealing properly, it may be time to replace it. A faulty gasket can cause your refrigerator to work harder, increasing your energy bills. Replacement gaskets are relatively inexpensive and can often be installed yourself with a few simple tools.
Final Thoughts
Cleaning black mold from your refrigerator gasket is a quick and easy task that can make a big difference in the cleanliness and efficiency of your kitchen. With vinegar, baking soda, and a little elbow grease, you can restore your gasket to a like-new condition in minutes. Regular maintenance will keep it clean and mold-free for years to come.